
Unity
Utilizing Unity Packages for Reusable Code Chunks
Intro
So, you find a good way to solve a particular problem while working on a project, and you write some code to handle it. It gets integrated into your project and everything works. Yay! Now if there’s one thing I’ve learned about Unity, it’s that there are tons of repeated patterns of problems. So, it’s not too hard of stretch to imagine that the problem that you faced and solved in project foo you will also find your new project bar. Common practice would say to just copy the code and be done with it. And for small snippets of code, that totally makes sense. For larger problems, well, maybe not so much.
As an example, a lot of my projects I’ve been working on lately make use of procedural meshes. So I’ve created some code to provide an easy-to-use interface for creating dynamic meshes and interface w/ Unity to translate to in-game objects. Over time, I’ve slowly added features to this code base to handle new use cases. The result is a self-contained set of functions and assets that I can use in a wide range of projects. And while I could technically copy this code from project to project, that ends up being quite a bit of overhead. I have things like unit tests, shaders and unity test scenes that I used to develop the set of mesh routines. I want to be able to treat this code as a single unit, and use it in whatever project I want, without that project worrying about the maintenance of the mesh code.
This tutorial will cover how I go about doing just that by utilizing Unity’s Custom Packages. While Unity packages can be used for a number of things, including models, textures, and other custom assets, this demo will show you how to setup custom packages for C# code assemblies. Allowing you to easily share common code across your Unity projects.
Basics
There’s a few assumptions that I’m going to make here:
- You’re using Unity and have C# projects
- You’re using git for version control
- You have a single release branch (this demo just uses master)
- You have code that is modular/self-contained and want to use it across multiple projects
For the purposes of this demo, I’ll be introducing three Unity projects that I’m using as packages:
- tytest - A simple test framework for tests in Unity.
- tymesh - A utility class for working with dynamic meshes
- tysimpleshape - A utilily class that uses the tymesh package and introduces simple shape primitives.
Building a Unity Package
There’s a little setup and reorganization that’s needed to setup a Unity package. While there’s likely multiple ways of managing a Unity package, my requirement for my workflow is that I need to be able to manage each package as a complete Unity project. That way, if I need to make a change to a package script, I can test make that change locally in a full blown Unity project, make sure it compiles and run any tests that I may have for the package before creating a new package release. More on this below…
Project Layout
Unity has a suggested package layout convention documented and I’m going to take this format and embed it within a pretty standard Unity project layout.
<root>
  ├── Assets
  │   ├── Scenes
  │   ├── Scripts
  │   └── <package>
  │        ├── package.json
  │        ├── README.md
  │        ├── CHANGELOG.md
  │        ├── LICENSE.md
  │        ├── Editor
  │        │    ├── Unity.[YourPackageName].Editor.asmdef
  │        │    └── EditorExample.cs
  │        └── Runtime
  │             ├── Unity.[YourPackageName].asmdef
  │             └── RuntimeExample.cs
  ├── Packages
  └── ProjectSettings
You may find that you have other folders in the package for other assets, such as textures, shaders, sound files, or whatever. Modify as you see fit. The important part is that all files that should be part of your package should all live under the package directory.
I’m going to use a git trick to manage the package directory as a separate subtree branch from the main branch. I’m going to name this branch upm and will manage release tags off of this upm branch. git subtree is an alternative to submodules and in this case, allows me to break off of a chunk of the repo and manage it as a separate branch. This separate branch will then also be what Unity will end up pulling from, so when it loads a package from git, all it sees is the package subdirectory, not the entire project directory. Pretty cool, but takes some getting used to.
Once you get your project to match the layout above, proceed to the next step below.
Namespaced code
Perhaps this isn’t a mandatory step, but it’s usually a good idea to namespace your package code. The whole point of this demo is that you have a chunk of code you want to reuse, so to me it just makes sense to have all that code belong under a namespace as a way of organizing the classes. It’s real easy to do… In all of your <file>.cs files, wrap your classes with a namespace definition, like so:
namespace TyMesh {
    // Class definitions go here
}
All code that belongs to that namespace can reference any other public classes within that namespace directly. Any code outside of the namespace definition needs to reference using the full namespace.class path or by utilizing the using keyword. Basic C# stuff here.
Assembly Definitions
According to Unity: “You can use Assembly Definitions to organize the scripts in your Project into assemblies. When you create an Assembly Definition Asset in a folder, Unity compiles a separate managed assembly from all the scripts in that folder. Scripts in subfolders are included unless the subfolder has its own Assembly Definition. These managed assemblies act as a single library within your Unity Project.” You can read up on the properties and benefits of assembly definitions here.
You must create assembly definitions when creating packages, as referenced in the Unity docs. Note, that you should create separate assemblies for editor and normal code (see the assemblies referenced in the subfolders above).
Assembly definitions can be created within Unity. In your project panel, navigate to the Runtime folder as identified above. Right click in panel (or choose Assets in top menu bar), select Create, select Assembly Definition.

Give Unity a minute or so to bring up the inspector window for the newly created assembly definition. Under name, select the name of your project. Rename the asset file to also be your project name. If you have editor code, create a separate assembly for that, using a .Editor suffice to your package name.
package.json
Within the directory structure above, you’ll note that the top-level package directory has a package.json file. This serves as Unity’s Package Manifest and is a required file for Unity packages.
{
    "name": "com.ptjal.tymesh",
    "displayName": "TyMesh Dynamic Mesh Generation Package",
    "version": "0.2.0",
    "unity": "2019.2",
    "description": "tymesh - A Unity package providing methods for dynamic mesh generation"
}
Unity states that the name and version are the only required fields, but strongly suggest all of the above fields for better management and visibility of packaging. displayName gives user-friendly name to the package, as seen in the editor, description provides a brief package description that will display in the details view for the package, and unity identifies the lowest unity version the package is expected to be compatible with. See the manifest page referenced above for all the available fields.
Readme/License/ChangeLog
These are not mandatory files either, but provide some basic documentation and licensing for your package. Standard disclaimer, I’m not a lawyer, so I’m not going to tell you what you should or should not put for your license. Having a Readme is nice to give some context on what your package provides and/or how it should be used. A changelog is also nice to include, especially if you plan to make your package publicly available.
I’ll be showing how to use tags to reference package versions, so it is nice to have the change log, the package.json and the git tags in sync.
Packaging the Package
So, assuming you’re still following along, you’ve organized your project as described, created all of the required extra package files and you’re ready for the next steps. Here’s the basics of what we’re going to do next:
- Commit all changes to main and push to master
- Use
git subtreeto create aupmbranch, pushing master content toupmand uploading to origin - Update the changelog and
package.jsonwith a new revision. Push those changes to master and theupmbranch. - Create a tag on the
upmbranch for the new release.
Let’s start!
Commit
# commit your local changes and push to master
$ git add ...
$ git commit ...
$ git push
Git Subtree
# run from base directory of repo
# use gitsubtree to split your repo and push subtree to separate branch
# Assets/<package> should be the name of the folder containing your package files
$ git subtree push --prefix Assets/<package> origin upm
Create Revision
I’ve been using Semantic Versioning to label my releases. This uses a version string formatted as: major.minor.patch and gives guidance on when to use each. You are obviously welcome to use whatever versioning scheme works best for you. When creating a new revision, you’ll need to update the version in two spots: the CHANGELOG.md if you’re using it and the package.json.
# update package revision, e.g.: 0.1.0 might be my initial version for a package
$ vim CHANGELOG.md ...
$ vim package.json ...
# push revision changes to master and upm
$ git add ...
$ git commit ...
$ git push
$ git subtree push --prefix Assets/<package> origin upm
Tag the Release
# download and check out upm branch from origin
$ git checkout upm
# create tag for your release
$ git tag 0.1.0
# push tags to origin
$ git push origin --tags
# return to master branch, delete local upm branch
$ git checkout master
$ git branch -D upm
I remove the local upm branch after tagging to try to prevent any mistakes that could be made by commiting locally to the upm branch. The merging strategy for upm has all changes from master being directly pushed and merged to upm. No changes should be made directly to the upm branch.
Battle is half done and we should have a proper Unity package ready to be referenced.
Referencing a Unity Package
Luckily referencing a Unity package is much easier then creating them! I’ll show you two ways. For this part of the demo, I’m going to reference my modules from my old blog page, which I’ve updated now to be Unity packages:
- tytest - A simple test framework
- tymesh - A utility class for working with dynamic meshes
- tysimpleshape - Another utility class that provide simple methods for drawing lines/dots in Unity
In this example tysimpleshape utilizes methods from both tytest and tymesh, so let’s take a look at how those dependencies can be met by using Unity packages.
Registry Hacking
Unity keeps track of all of your project’s package dependencies in the manifest.json located in your project’s Packages top-level folder. To reference a Unity package from a github repo, all you need to do is modify the manifest.json file, as outlined below.
{
    "dependencies": {
        "com.ptjal.tymesh": "https://bitbucket.org/ptjal/tymesh.git#0.1.0",
        "com.ptjal.tytest": "https://bitbucket.org/ptjal/tytest.git#0.1.1",
        ...
    }
}
You add a new line for each package dependency within the dependencies section of the file. Each line uses a key (e.g.:"com.ptjal.tymesh") and a value (e.g.: "https://bitbucket.org/ptjal/tymesh.git#0.1.0"). The key must match the name you assigned in the package.json file of the package. The value is URL for the git repository. Note that in this example, I’m referencing a specific version by appending the #0.1.0 syntax to the repo link.
Note: mind proper JSON formatting. I tend to make my additions to the top of the file, but if you add to the end, make sure don’t leave a dangling comma.
Unity’s Package Manager
I’m not 100% sure when this feature was added, but in Unity 2019.3, you can add references to git repos directly from Unity’s Package Manager interface. From the top menu bar, select Windows and Package Manager. This will bring up the Package Manager window.
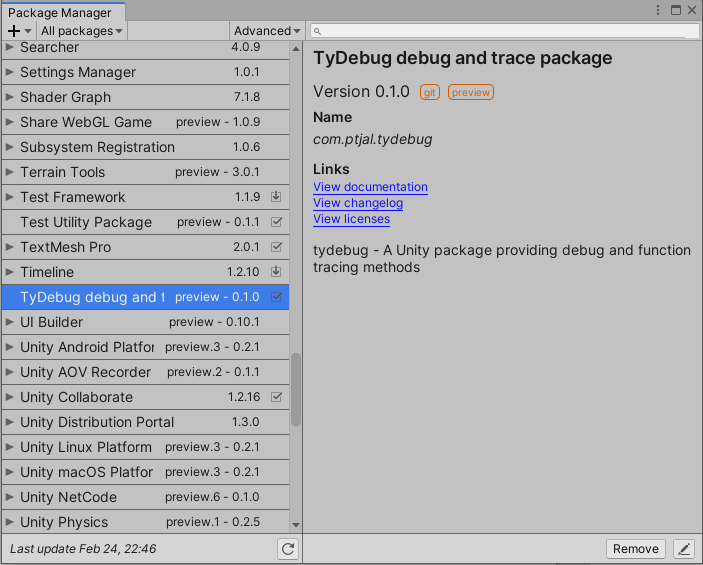
In the upper left hand corner, click on the + button to add a new package. Select Add package from git URL ..., then enter the full URL and optional version info.
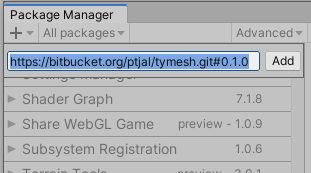
Both of these methods should cause Unity to download the package from the specified URL and integrate it into your project.
Private Repos
Well, the official word from Unity is that private repos that require authentication are not yet supported by Unity’s package manager. Reading on Unity’s forum threads it appears that this feature is high on their priority list and may come out in Unity 2020.1. I’ll keep my fingers crossed.
You may be able to work around this limitation by setting your local git client global config w/ credentials for you private repo. I was able to pull from a private repo doing this, but your mileage may vary.
Nested Dependencies
In general, it’s a good idea to have your packages all be nice, neat, self-contained packages without any dependencies on any other packages. And while this may be a goal to strive for, the reality is that you may end up with some dependencies that need to be accounted for in a package.
Fixing Assembly Definitions
If your package you’re building has code dependencies on other packages, as soon as you add an assembly definition for your new package, you will get compiler errors within Unity. This is because the assembly definition expects everything within the definition to be self-contained. However, you can add external dependencies to your newly created assembly definition.
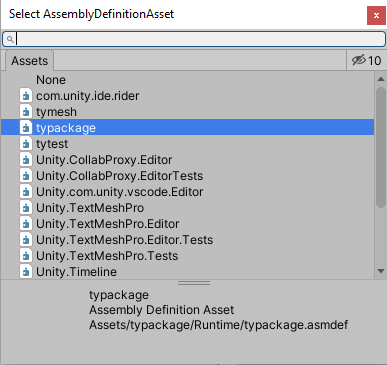
Within Unity’s Project Window, find your assembly definition file and click on it to bring up the inspector. Find the Assembly Definition References panel:
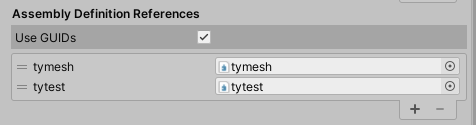
Click the + at the bottom to add a new reference, then click the little bullseye to select your assembly definition from the available assemblies in your project.
Do this for all referenced packages.
Manually Managing Dependencies
Unity’s package.json definition file does have a dependency key that can be used for official unity packages. Unfortunately, it doesn’t seem to work for custom git references. So, this means that if your new custom package is dependent on other custom packages, you will need to manage these dependencies manually. All this really means is that when you go to pull the new package into another project, you will need to manually add any other dependent packages in as well. Not that big of a deal, but something to be aware of.
Maintaining Unity Packages
Updating a package follows the same procedure as setting up the initial upm branch and tagging.
- Make your local changes to the project. Including changes to changelog and
package.jsonCommit. - Use
git subtreeto push changes to yourupmbranch. - Create a tag on the
upmbranch for the new release.
# commit changes to master (including any changes to package.json)
$ git commit ...
# push changes to upm
$ git subtree push --prefix Assets/<package> origin upm
# checkout local upm
$ git checkout upm
# create tag for your release
$ git tag 0.1.1
# push tags to origin
$ git push origin --tags
# return to master branch, delete local upm branch
$ git checkout master
$ git branch -D upm
Try It Out
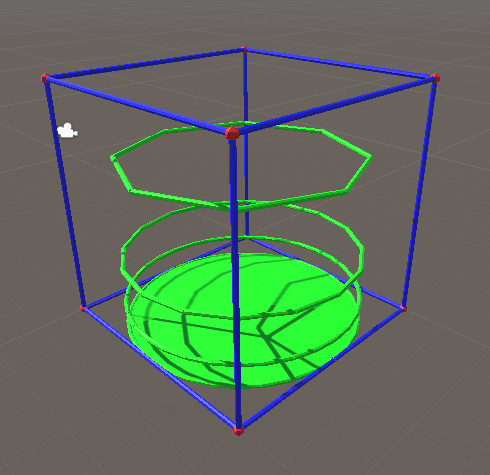
The referenced repositories are public. Feel free to try it out and/or poke around. Not much to look at, but here’s my little simple shape test:
- tytest - A simple test framework
- tymesh - A utility class for working with dynamic meshes
- tysimpleshape - Another utility class that provide simple methods for drawing lines/dots in Unity
Credits
Credits go to Scott Doxey for documenting how to use subtrees and branches combined with Unity packages. You can reference his writeup here.
Tylor Allison TUTORIAL
gamedev, unity, modularity, git, workflow